Monday, March 30, 2015

Low-Carb Loaded Baked "Potato" Salad

Alright, alright! Fine! I'll do a post about it!...If I have to....[grumble]...

...I guess I can't really call myself a cook if I don't take into consideration all dietary needs....

[sigh]...I can't ignore the ever growing trend of the low-carb diet. My parents are on it. I know friends who have tried it. And yes, even I have tried it. So today, as my last post for the Easter brunch countdown, I will post a low-carb recipe. For inquiring minds that want to know, I am no longer on a low-carb diet, not because it wasn't effective in aiding weight loss, but because my own personal dietary needs and preferences have changed. But for those of you who are on low-carb diets, for whatever reason, this recipe is for you.

When I was on a low-carb diet, I have to admit, I hated how much cauliflower was used as a substitute for everything. Rice, potatoes, bread, you name it! Cauliflower, that colorless vegetable that smells like fart, is used in loads of low-carb recipes. True, it is quite impressive how versatile this stinky little cluster can be, however; near the end of my low-carb days, I was all cauliflowered out. Except for one recipe....

Low-carb loaded baked "potato" salad is one recipe I really quite enjoyed. So much so that, even though I am no longer on a low-carb diet, I would still make this recipe again even though its primary ingredient is that one vegetable I came to loath. This recipe is, in fact, one that my mother came up with, so kudos to her for finding a way to make cauliflower taste so amazing!

Since baked potato salad is a classic side dish for many family gatherings (BBQs, parties, etc.) why not add it to your brunch menu? And if you, or any one of your guest is on a low-carb diet (or even if no one is!), this dish is sure to surprise everyone once you confess its main ingredient: cauliflower.

Obviously this isn't a picture of the dish. But we ate all of it before I even thought to take a picture. I guess that goes to show you just how good it was! ;)


Ingredients:
1 head cauliflower
1 Tbs olive oil
garlic salt & pepper
3-5 slices of bacon
1-2 green onions
1 cup (plus more for garnish) cheddar cheese, shredded
3-4 Tbs mayonnaise (add more or less as needed)
3-4 Tbs sour cream (add more or less as needed)
Red Hot
Salt & pepper
2 Tbs chopped chives, for garnish

Preheat oven to 400 degrees F.

Break up a head of cauliflower and drizzle olive oil and bacon fat over the cauliflower. Sprinkle cauliflower with garlic salt and pepper to taste.

Roast at 400 degrees F for 20 minutes or until edges are browned.

While the cauliflower is roasting, fry up bacon until crisp and chop up 1-2 green onions. When cauliflower has cooled, mix in bacon and onion with shredded cheddar.

Blend in (1 Tbs at a time) equal parts mayonnaise and sour cream. Add a few dashes of red hot. Salt and pepper to taste.

Garnish with chopped chives and cheese.

Let sit for at least 1 hour in the fridge before serving. 

Monday, March 23, 2015

Italian Easter Bread

The count down to Easter brunch continues this week with a visually stunning treat: Italian Easter bread. This dish does take a good amount of time to prepare but it is well worth it. In the past, I made it as a take-home treat for our Easter brunch guest. However, you can certainly serve these beautiful bread baskets as part of your main meal. The bread itself is mildly sweet and very fluffy, only to be topped off with an Easter classic: the egg.

You can choose to do as I did and make the Italian Easter bread using stark white eggs and pearl sprinkles to create a gorgeous contrast of shining white against a golden brown bread. Or you can make it a feast for the eyes using dyed eggs and rainbow sprinkles to celebrate the great spectrum of color that the Spring season has to offer. Either way, this recipe is sure to impress your family and friends.


Italian Easter Bread

Ingredients:
1 package rapid rise yeast (about 2 1/4 teaspoons)
1 1/4 cups milk
pinch of salt
1/3 cup butter
2 eggs, beaten
1/2 cup sugar
3 1/2 cups flour (approximate)
1 egg beaten with 1 teaspoon of water--to use as egg wash
6 eggs (dyed if you want a little color pzazz)
sprinkles

**The eggs do not need to be hard boiled. They cook when the bread bakes. Simply dye the eggs raw without hard-boiling them.

In a small sauce pan, warm the milk and butter together, just until the butter melts. In a large mixing bowl, combine yeast, salt, 2 eggs, and sugar. Add the warm (not hot--it will kill the yeast) milk and butter. Add about half the flour and beat until smooth with dough hook. Slowly add the remaining flour to form a stiff dough. Don't worry about how much flour it ends up being, just keep adding until the dough is not sticky anymore. Turn dough onto a floured surface and knead until smooth. Place the dough in a lightly greased bowl, cover, and let rise in a warm place until doubled in size--about an hour.

Punch dough down, divide into 12 pieces. Roll each piece to form a 1 inch thick rope about 14 inches long and, taking two pieces, twist to form a "braid", pinching the ends and loop into a circle. When you are done, you will have 6 braided dough rings.

Place the dough "rings" on two baking sheets lined with parchment paper. Cover and let rise until doubled in size--about an hour. Brush each bread ring with beaten egg wash. Add on sprinkles. In the middle of each bread ring, gently place an Easter egg.

Bake at 350 degrees F until golden--about 20 minutes. Cool on a wire rack.

When done, you can eat the bread and then consume the egg just as you would with a hard-boiled egg. You can make these ahead of time but be sure to refrigerate them until ready to consume.

Monday, March 16, 2015

Sherbet Mimosas

Mimosas: a classic brunch beverage. They are sweet and refreshing and practically a requirement for brunch. But what if there was a simple way to elevate your mimosa with very little effort at all? How is this possible you ask? Well, for today's blog I am going to cheat and refer you to another fellow blogger: The Cookie Rookie. My husband and I have tried this recipe before and it was a huge hit at our previous brunches. So do yourself (and your guests) a favor and give this recipe a try!

You can find the recipe here: http://www.thecookierookie.com/sherbet-mimosas/


So the picture above was borrowed from The Cookie Rookie's website. Believe it or not, but as I am busy inhaling my food and drink, I don't always stop and think to take a picture. So here you go, a borrowed image just for you. ;)


Monday, March 9, 2015

Prosciutto Wrapped Asparagus

Keeping with the brunch theme this month, today's recipe is one of my favorite brunch side dishes: prosciutto wrapped asparagus. It not only looks beautiful on a plate, but the combination of flavors is both refreshing and hearty. But don't let it fool you; this recipe may appear to look simple but it does take some time to prepare (what with all the wrapping of each asparagus and what-not). However, with that in mind, please don't let that scare you off from making it! Yes it takes some time to prep but the plus side is, you can make these the night before and refrigerate them until needed. Not to mention they are delicious and are sure to wow your guests.

So pull up a chair, crank up the music, and get to wrapping some asparagus!


Prosciutto Wrapped Asparagus

Ingredients:
1 large bunch of asparagus, the hard ends cut off
1-2 packages of prosciutto, cut into 1 inch wide strips
1 bunch fresh whole chives

Start by getting a vegetable steamer ready to steam the asparagus. While that is heating up, fill a large bowl with ice water and set aside. When the steamer is ready, steam the asparagus but only for about 15 seconds!--If you steam it for too long, you are going to have sad limp asparagus.-- As soon as you remove the asparagus from the steamer, submerge the asparagus into the bowl of ice water. This will stop the asparagus from further cooking. You're not wanting to cook the asparagus until it's soft. You're just looking to blanch them. After about a minute in the ice water, remove the asparagus and place on a kitchen towel. Gently dry off the asparagus.

Next, take strips of prosciutto and start wrapping single strips around each asparagus.

Once all the asparagus is wrapped in prosciutto, take a "string" of chives and tie it around the prosciutto on each wrapped asparagus (see the picture above).

Serve cold with dipping sauce.

Dipping Sauce

Ingredients:
Balsamic vinaigrette
Olive Oil
Lemon juice
garlic, finely chopped
pepper
red pepper flakes (optional)

Mix all ingredients in a small bowl and serve cold.

*You'll notice I did not specify any measurements for the dipping sauce. I usually just mix it to taste. If you really need a starting point for measurements, I'd say roughly 3 Tbl olive oil, 2 Tbl balsamic, 1 Tbl lemon juice. Garlic, pepper, and red pepper flakes are all to your own liking.

Monday, March 2, 2015

Savory Pancakes

Here comes Peter Cottontail,
Hopping down the bunny trail,
Hip-pity Hop-pity Hip-pity Hop-pity,
Easter's on its way!

We have officially entered the month of March! Crazy right? This means two things: Spring is almost here and so is Easter. I don't know about you but when I think of springtime and Easter, I think of brunch. That glorious meal that combines all the sweet deliciousness of breakfast with the savory bounty of lunch. A meal that showcases a sampling of dishes to satisfy all cravings and a beautiful array of cocktails to cast everyone in a rosy glow. Whether you celebrate Easter or not, I say, either way, use the day as an excuse to make brunch!

This month, I will be posting some of my favorite brunch recipes in preparation for Easter. For those of you who might be looking for Easter brunch ideas, hopefully this will give you enough of a head start to plan your menu accordingly. Today I'll be posting one of my favorites: savory pancakes. As a lighter alternative to a classic oven roasted ham, savory pancakes can offer a great variety of flavors that you can easily customize to your own preferences and their presentation can be quite beautiful on a plate. Listed below are only a few options for toppings. But the possibilities are endless. Get creative and have fun with it!


Savory Pancakes

Ingredients:
pancake mix (either instant or homemade)
topping suggestions:
     -cream cheese, cold smoked salmon, and green onions
     -cream cheese, cold smoked salmon, and capers
     -goat cheese with strawberries, basil, and balsamic vinaigrette
     -apricot jelly, blue cheese, and  pecans
     -cream cheese, bacon, and green onions

Cook up pancakes according to directions. I made my pancakes into medallions (about the size of a sliver dollar) so that they were lighter and easier to snack on.

Allow the pancakes to completely cook before topping them with whatever combination of toppings you desire. My favorite combination is cream cheese, cold smoked salmon and green onions or capers.


Monday, February 23, 2015

Hippo Sandwiches

Being sick sucks! Being a sick parent with kids who are also sick sucks even more! For the past week my poor boys have been battling a nasty head cold and, as of yesterday, my husband and I have caught it. Piles of used tissues are starting to pile up in our home, there is a hint of Mentholatum in the stale air, and the overall mood of our family has been quite gloomy. Yesterday, as I tucked my kids into bed for their nap, stroking their hair as I held a tissue up to my red and drippy nose, I began to think back on when my parents used to take care of me when I was sick. My mother was ever vigilant about keeping me pumped full of fluids as I laid under a mountain of blankets. I remember her stroking my hair and talking softly to me as she would give me my next dose of medicine. But in one particular memory, I remember my dad was coming home from a long and busy day (he was working two jobs at the time) when he decided to bring home some Taco Bell for dinner. Knowing that I was still feeling sick with very little appetite, he bought me a simple cup of re-fried beans with cheese on top. In that moment, it was the best tasting beans in the whole world. The warm cheesy beans were so kind to my sore throat as I ate, and it was the first "meal" I could really stomach all day. From that point on, any time I have gotten sick, I find myself wanting a nice cup of cheesy re-fried beans.

Comfort food can be powerful stuff. And I'm not just talking about the pint of ice cream you wolf down after a bad breakup, or the late-night bacon guacamole burger you make-out with at the end of a stressful work day. I mean the one dish that, no matter when you eat it, it awakens a memory deep within you that instantly brings a smile to your face. Even though I felt horribly sick, that silly little cup of re-fried beans my dad bought for me instantly turned my mood for the better. For some, it's a bowl full of chicken noodle soup. For others, it's a nice cup of lemon tea. Whatever it is that brings your tired and achy body just a little bit more comfort; I truly believe it can go a long ways towards helping you recover. As my mom used to say: where the mind goes, energy flows. To put it bluntly: happiness, even in the form of a meal, is powerful shit.

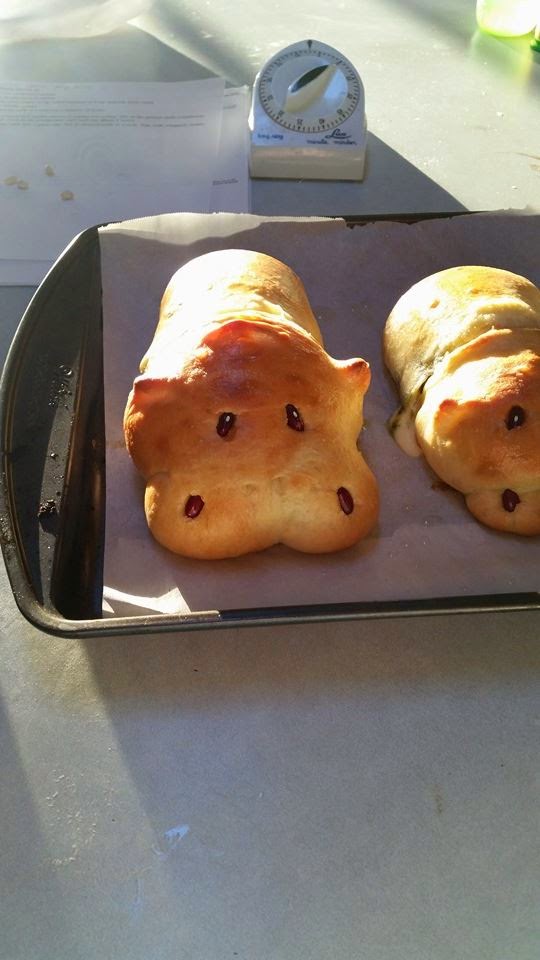
For myself, I often try to show my love to my family by providing good food. I like to go the extra mile to make healthy, delicious, fun food that can bring a smile to my family's face. As I sat there, watching my two boys sleep, their poor little stuffy noses and rattly breathing tugging at my heartstrings, I decided to make a dinner that night that would help lighten the mood for my family. So I set to work on making the most ridiculously cute and oh-so-tasty dinner they'd never forget: hippo sandwiches swimming in tomato soup. Yup, you read it correctly: hippo sandwiches. I was thrilled with how well they turned out and even more so at how happy and giggly it made my whole family (my husband included!). Those delicious little hippos did the job at comforting my family in a time of need, and I'm happy to say, after eating them, my family has quickly been on the mend. It's amazing what good food and a good mood can do for the body!

Perhaps some day, when my boys are adults and they come down with a head cold, they just might find themselves craving hippo sandwiches. I would love to see the look on their significant other's face when they say "Honey, can you make me a hippo for dinner tonight?"


Hippo Sandwiches

Ingredients for bread dough:
1 cup warm water
2 tablespoons coconut oil
1 teaspoon salt
1 egg beaten
1/4 cup sugar
3 cups all-purpose flour
3 teaspoon quick rise yeast (aka instant yeast)

Add all ingredients to a bread machine in the above order, and choose dough setting. Or, if you don't have a bread machine, mix all ingredients in a bowl until a soft dough is formed. For dough into a ball and turn into a oiled bowl. Over and let rise for about an hour.

Ingredients for hippos:
bread dough (follow recipe above)
3-4 cheese sticks cut in half
pesto
1 egg + water (for egg wash)
melted butter for brushing on buns after baking
black beans

To make the hippos, I found a great website that shows you step by step instructions on how to put them together. The only variation I did is to stuff the body of the hippo with cheese and pesto. Check back here after you see the instructions below.
 http://www.handmadecharlotte.com/healthy-hungry-hippo-soup-recipe/?pp=1

When it comes to forming the dough ball for the body, roll it out flat like a small pizza. Next, put a spoonful of pesto in the middle (don't worry about spreading it around) followed with half a cheese stick. Grab the edges of the dough and, creating a pocket around the pesto and cheese, pinch and roll the edges together. When the filling is completely encased inside the dough, flip the dough ball over (so the pinched side is underneath) and use that as the body of your hippo.

Preheat oven to 375 F. Line a cookie sheet with parchment paper and lightly brush the paper with oil. Set baking sheet aside.

Once your hippos are stuffed and assembled, place them gently on the prepared baking sheet. Brush the hippos with egg wash and then bake in the oven for 12-15 minutes.

Remove hippos from oven and, while they are cooling down, brush each one with melted butter. Following the instructions for assembling the hippos from the website posted above, add the black beans for the eyes and nostrils.

When the hippos are complete, gently place the baked hippo sandwich into a bowl of your favorite hot soup. Serve hot.


Monday, February 16, 2015

Hot Buttered Rum

It was Christmas morning when I had my first true taste of hot buttered rum. I say "true taste" because for years my mom had been serving my brother and I hot buttered rum sans the rum; basically hot water mixed with hot buttered rum mix (ie: brown sugar, spices, and vanilla ice cream). We were too young to have the alcoholic version of the drink and, to be honest, I was still legally too young when I had my first alcoholic version of hot buttered rum. There was only half a shot of rum at best in the entire drink, but it still made me feel pretty cocky to be drinking alcohol like bad ass (what can I say: I was a middle-schooler). When the creamy sweet drink hit my tongue followed by the unfamiliar bite of rum, I could feel the warmth travel down into my chest as my face grew more and more rosy with each sip. That particular Christmas morning was filled with random giggles, sleepy firelight, and a goofy grin I just couldn't explain.

So why is it called hot buttered rum? The brown sugar mix that you buy in stores tastes nothing like butter. Is there even butter in it? Don't get me wrong, it's friggan delicious! But I couldn't understand why it was called hot buttered rum when butter seemingly had nothing to do with this particular concoction. In order to answer that question, one must rewind back to the 1650s when Colonial America first started distilling rum from molasses imports. When hot buttered rum was originally made, it had very few ingredients. Typically it contained nothing more than: rum, hot water, sugar, butter, and nutmeg (or other mulling spices). That's it. Hey, what do ya know! It contains hot butter and rum; now the name makes sense, right? Today's modernized version is way more sweet and rich than it's original predecessor, now comprised of heavy amounts of brown sugar, spices, and ice cream. As our modern "hot buttered rum" leans dangerously in the territory of being a melted milkshake with rum, the original festive beverage is nearly all but extinct.

This winter, I decided to forgo the modern version of hot buttered rum and give the ol' original recipe a try. Although this recipe tastes almost nothing like today's hot buttered rum, it isn't nearly as overly sweet, and it has an alcoholic kick that will certainly leave you feeling warm on a cold winter's night! Although Spring is quickly approaching, there are still plenty of cold days left to give this recipe a try. So if you are brave enough to ditch today's standards for hot buttered rum and mix up a cup of true history, give this recipe a try.


Hot Buttered Rum

Ingredients:
1 tsp. brown sugar
boiling water
1 jigger rum
1 pat unsalted butter (plus a little extra to butter the inside of the mug)
nutmeg

Butter the inside of a mug. Drop in sugar, fill not quite half full with boiling water, add the rum and pat of butter, and stir. Grate nutmeg over the top. This makes one portion.